Mini Storage Proofs
The intended audience of this post is someone who wants to understand storage proof in a handy way with more detailed code as an example.
This blog post is based on a personal project mini-storage-proofs. The goal is to simplify the whole workflow with minimum implementation from accessing data on a chain in a trust-less way. Check out the full code here. Also check out the talk video explained with this project.
What are storage proofs
Storage proof has been a rising topic in blockchain (especially scaling solutions like L2s around Ethereum) infrastructure recently. It is crucial to deliver an on-chain state in a fully trust-less manner. We can also retrieve the same data from elsewhere like RPC providers, oracles, etc, but storage proofs ensures all of the flow of on-chain data is proven. For those who are interested in theoretical explanation around storage proofs, recommend to check out this article.
Merkle Tree with blockchain
Blockchains store data using data structures like Merkle Trees, and Merkle Patricia Trees. Which can verify any one of the node’s existence in the tree using the path of the tree. In Ethereum, the block header contains multiple trees’ root hash, let’s take a look at one Merkle tree together.
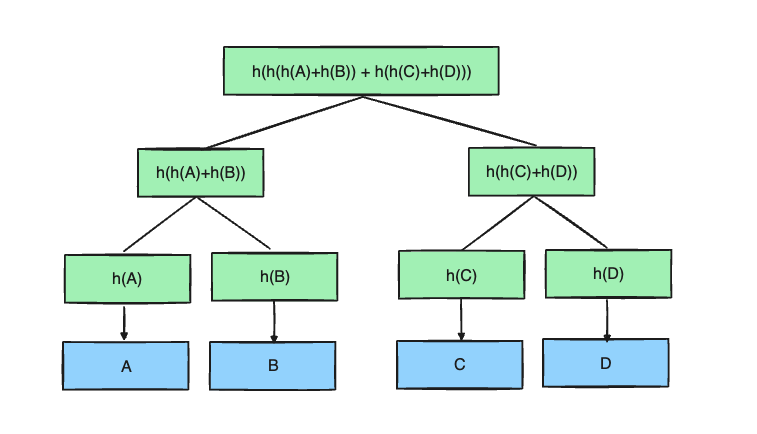
I know this sounds boring.. but this is almost all the story of storage proof.
What is the Merkle proof of the value A? Merkle proof is also called as Merkle path, which list of elements that you can construct the root of the tree with the targeted element. In A case, it will be [h(B), h(h(C)+h(D))].
What does it mean by the constructed root of the tree? Also called as verify the proof. Based on the example above, verifying Merkle proof of A would be like a hash key of A with all the elements in the Merkle path. ex. h(A) -> h(h(A)+h(B)) -> h(h(h(A)+h(B))+h(h(C)+h(D))) and this final value should be same as the root of the tree that we already know.
If we can assume we already have a valid root of the tree, after this whole process we can trust value A as well. Which A is the one containing the detailed information that we aimed to get.
This is important because the key point for storage proof is to deliver on-chain data in trust-less(valid) way. Because blockchain(on-chain) data is composed with Merkle trie data structure we could deliver and retrieve desired data fully trustless way by Merkle proof as just mentioned.
Proven blockheader
During the Merkle proof verifies process, there was one important assumption involved: We need valid root.
In this blog post we will not dive deep into this topic, we are just going to use syscall to get the current block hash through on-chain ( which is limited to the latest 256 blocks). If anyone wants to learn more about getting a historical state in a trustless way, would recommend checking out this article.
Storage Proofs workflow with EVM
Now lets go through mini-storage-proof with codes. This project implements Herodotus Storage Proofs workflow step by step both in Ethereum and Starknet. We will first take a look at full EVM workflow.
1. Accessing the block hash
In this case, use the BLOCKHASH opcode to access the block hash. If want to access older than 256 blocks from the latest block, need historical accumulator to store all block hashes onchain in trust-less manner.
- evm/EVMStorageproof:
   // =================================
    // Step 1. Accessing the block hash
    // =================================

    // get origin chain's block hash on destination chain
    function getBlockHash(uint256 blockNumber) public view returns (bytes32) {
        // Ensure the block number is within the last 256 blocks
        require(blockNumber < block.number, "Block number is too high");
        require(
            blockNumber >= block.number - 256,
            "Block number is too old, use accumulator"
        );

        // Syscall to get block hash
        return blockhash(blockNumber);
    }
2. Accessing the block header
From the first step, we now have a valid block hash. Block hash is the hashed value from the block header, that the information that we want to retrieve ( like some data exist in MPT ) exists in the block header as root. Just to be simple, we need a valid block header to get valid data, and the block header’s validity can be ensured by the block hash’s validity that we retrieve in previous step.
So first, get the block header through off-chain.
- offchain:
pub async fn get_encoded_block_header() -> Result<()> {
    let block = client.get_block(BlockNumber::Latest).await?.unwrap();
    ...
}
The result block header bytes will look like this
0xf90236a026cce44dd5ba58adae56e4276aeeaa5a792f5fafc294592ca3e8d29e74f87de1a01dcc4de8dec75d7aab85b567b6ccd41ad312451b948a7413f0a142fd40d49347940000000000000000000000000000000000000000a05cce51e7db6bf1e2b4ed181f128af4e520366d5e8bb76be4c3751ca0fac93d86a091751be0fd141d7d984b391aad90dcd0d28e42dd9e7c1852d0cf9e2c89170b14a0af86bc4b0c363740f2e144b748f467d0fb72c45e75ed80384052ebb046534d7bb90100020148492000002800000000620101002030051202008901018204020e00000200008804040a00021c00104000002000084100f0c800130c02400418002c2224e1024004a8000010900052098000800400050007020608100048100004108820100090040202404000400080000008010cb000410508000404004010488c60c1a02400ca189009c0240010c00200024080200040102002d01c04428805000000420c80002001380283000010200000280617000000000004000d030400000100900008e2406040448002a000010040080000202000884004001100200843e002043810040021a000000102000000280d000900101200c0c9000000000042060080839ae0728401c9c38083617f1984656c603499d883010b04846765746888676f312e32302e32856c696e7578a0af372462b5534d9942ccaec13fcfabeb44b081fdb28de99b82d401ce212ae5f78800000000000000000da05f6ec98a32825667e4a87a4aeefb6fda5115ccc53b244467e4a86480a98590ac
Next, pass this block header as input in the contract to verify with the block hash that we retrieve in the previous step. In Ethereum, block hash is keccak hashed value of rlp encoded (bytes type) block header. The code is implemented to retrieve the block hash by giving block header data from input and comparing it to the block hash directly obtained from OPCODE. In this way, we can make sure about the validity of the provided block header.
- evm/EVMStorageproof:
   // =================================
    // 2. Accessing the block header
    // =================================

    // verify origin chain's block header on destination chain
    function getBlockHeader(
        uint256 blockNumber,
        bytes memory blockHeader
    ) public view returns (bool) {
        // Step 1. Retrieve the block hash
        bytes32 retrievedBlockHash = getBlockHash(blockNumber);

        // Step 2. Hash the provided block header and compare
        bytes32 providedBlockHeaderHash = keccak256(blockHeader);

        // Step 3. Verify it
        if (providedBlockHeaderHash == retrievedBlockHash) {
            return true;
        } else {
            return false;
        }
    }
3. Determining the Desired Root
If you can get a verified block header, you can decode it to get any kind of values that you want. In Ethereum, the block header you get from the input is rlp encoded one and if you decode it you can get the roots of MPT structures like state root, transaction root, and receipt root. All of the roots are roots of the Ethereum state tree like the state tree, transaction tree, and receipt tree which is composed of elements as information that you might be interested in.
- evm/EVMStorageproof:
    // =================================
    // 3. Determining the Desired Root
    // =================================

    // get origin chain's state root on destination chain
    function getStateRoot(
        uint256 blockNumber,
        bytes memory blockHeader
    ) public view returns (bytes32) {
        bool is_valid_header = getBlockHeader(blockNumber, blockHeader);
        require(is_valid_header, "Invalid block header");

        Lib_RLPReader.RLPItem[] memory items = blockHeader
            .toRLPItem()
            .readList();
        return bytes32(items[3].readUint256()); // The state root is the 4th item in a block header
    }

    // get origin chain's receipt root on destination chain
    function getReceiptsRoot(
        uint256 blockNumber,
        bytes memory blockHeader
    ) public view returns (bytes32) {
        bool is_valid_header = getBlockHeader(blockNumber, blockHeader);
        require(is_valid_header, "Invalid block header");

        Lib_RLPReader.RLPItem[] memory items = blockHeader
            .toRLPItem()
            .readList();
        return bytes32(items[5].readUint256()); // The receipts root is the 6th item
    }

    // get origin chain's transaction root on destination chain
    function getTransactionRoot(
        uint256 blockNumber,
        bytes memory blockHeader
    ) public view returns (bytes32) {
        bool is_valid_header = getBlockHeader(blockNumber, blockHeader);
        require(is_valid_header, "Invalid block header");

        Lib_RLPReader.RLPItem[] memory items = blockHeader
            .toRLPItem()
            .readList();
        return bytes32(items[4].readUint256()); // The transactions root is the 5th item
    }
4. Verifying Data Against the Chosen Root
You might want to retrieve specific values beneath that root. In this case, first need to generate compatible inclusion proof in off chain. The below code is generating account proof for my wallet.
let proof_response = client
        .get_proof(
            "0x3073F6Cd5799d754Ea93FcF54c53afd802477983",
            vec![H256::zero()],
            Some(BlockId::Number(BlockNumber::Latest)),
        )
        .await?;
If the off-chain repo with cargo run command, all the inputs for a contract are printed.
The proof bytes will looks like this:
proof: 0xf90d33b90214f90211a004fbcad970a4b1d1d1a7af3fa6a5da1ca45ba1b6eea7d78dee6db3733565cbc3a06942c962330b1d5743f6f9bd1d4fa054057a841ba413f6a24ac05b64338b32b2a03d4fcd8850ce7f5fec433df153aa26a202c5fc12e9f797c65ea045e9ee05c6e4a019b7f195fc254bab9cd39cf5285cbdffa08c65780920cbb1c9c863ff6a8e9dd6a0503bbb5fdc583781eee12d429b45c2edd43bb487d660dacc088bf77f7f6f4fe6a074643bb674c51a98662f00a4944d922606c2b048270e163cce0232417086ed1ea0f0f1ece2adfc1e441f8ea025547926431ef5019db22823c5c087792b0bd479c3a053c92438461251f73b6861ed706640e6e588ab115e910f1882ec23173e2d69c0a080da19f50b06c50c30af1725ab2cb101c2085ac3fb502884280fe5852e490818a089fc218fbb679764986e641e9df4914dbbaed209ac3a546e761fcd73534402e3a0f9d2eb7269208172e5d5fd4e9116259b94cf915e4780b244b0444ae9c90666b1a05be39eaaed1f3b1bc2de7b3b328117bc207c6a9f7a09f0cb14a46ed285cdaa6fa01a2f3ac7cc5e6ccb605bd2bd88f8b1fffcfa2adf973b36726f4057979cbcbabea0ad970ffbd00482122c93c1e38681945be04a9eba9d201148303fe8fa7daec479a03cedaa0f476a735ba5a1f6080a717d2d237ef1ec9fc93efc53b430d74ec7ac93a033a9d788d22c47276d4b0669b03b3a7797a916f85b8dd4437e52d3115dda71a280b90214f90211a0521398ada3031471b791bea799e7ea6dc6524bae5c28de7ff6849e3a2263ca62a01bde280b678b09d45181b01657223711c9e459f33cf175c1efedf73a19897c6fa06586355d9438038214485e3506470000552ed88b251481d6ceab1892fd0a67a2a0f0bb9a0a9555c61368a0679ea6f9b2fe07fff2a48acc8218bcbdacf3106a6742a09e0fc0ce87e93f97775854d6dbbb0d9748adca6e7dcaebd4adb7e6dd8a0263b5a0e3ead0fffd2648b371e8db16e73c29a35feaef8d08f677dc484d6fc23e30d4dea038e004587a5db74e845e4041738a0e4a3375d3afe6e5457f233dde2570bb9454a0333d3ac7a32f46a83bcc4163487a9df174316e609094731db9d41389eed706e3a00ea620f7401645302ec05095e1afa0268815afd3f4446108ae474b166666a995a0ad39695fc147b44683274394f6b66f73db708097bf20356be01663d167ebe12da090dda5a57e086466d352d25a4a552d812b3a361a816c936746bdadb5022cac0aa0a6e93d5e18df6439155736f91ed56cc4725fb41f0b89029569dc593985c1ccd0a02f388eb2280a0ea744e19f04b582c85bc0c90de0559140d0b0ae3439ddb2a547a03ee7844779d3d8304ddb208768981ef9e4116ffd1a7abc9d2e3ba34d72e83713a00d87c250a1cddb2e166b1da74dbb6f1e80aa027082ed691e01d4719e44868ccaa009adbf6f711dd72216d0eb531be854e77f91171b6af5344aea94471ca33a7b9e80b90214f90211a02176cc56151112bdc81412a94258b1823ae5f6e7d3091ccdbc7762c17bf94d21a0a412155f8b307e85e000d44d07feaf1fe4c119a53da337e0df1cede8ba722a33a05ce92fc72ea04244b87f0572f87ac90504d6a3afcd4dd05154485fce7ef8aca6a02e21385d81a138440b3935b064b1ac51847cdbb8b7c3f0c662a8369ab9c7daada02f60906e2c343822c3893c973c8e8a45edf6c839cb022dd9e0728a08bce19c34a00e23d4f90ceece113bdbdc5df8914ab703f1b80a03274d65633871f018dd2602a05676053f5073ee707f11cd1dbbc79c0a95c4eef9d31a091bf8143d618062bd05a04521c6030bd3b57154977425cc4e2ae7dd8fdd57163e4984855e0de64f3f1379a02c27f14f5af46cea5737697b13e64f0878a7d187bc199f19d376bce40772fb44a054e2d22d72d33592d08f99e0a2a7290fcbe1afd276edbe0891c28250d66823c1a0fecaf1d601f9bc82b595a515580ac53de245140289dd087f9a754529f2d10da9a0daa4907da14dfd9cdcd325e99a1b9e4cbdd781c3a02d0e4fad81359f2f171b6ca094322dd8bcb4587a8ac705a944932a1bf58f82a35f06951f4d1a6cd79276ba95a02d63aaa1f85d38e0ba92acad343b5f340a96b8b57f125add3830192301c0fb6aa0f683fb9fb7b2dfee7bc79eca96fd8f67ac9044851869d02e883962365dc2a775a0b06fae9df1417ab10d179441906fa342bccdf1bf68292cb8436769b9368479bd80b90214f90211a08603ba9a7f285860a41da7aecd2e4019d047231dccdbbc4690954d3b189501eea009ec02cdf86de6c295c8f732bb6540e2cd6818453455484adb1e7d63d1a85959a00a6607ff31732853f2d1ff6ce1bc6d6b193d398d7999573129f55b7d50479b7ea0840c53d4c1a9d3e2afeec5fb260dfb8b234ca4e0481d65d358118e9bf6b864eaa020a9a66d7d0a189d8cf6a204c149f732b5b9e072b78cf6ea5b2bb20b886efcf7a0cdbeff6339725fafe044bfff6d603f996c3485fd20b83e603160ee72a7961da3a0bea7ce32e376f1562abe6bced3dbe77139e33dfd6876648608d023be508b7f4ba0d22a9a9525b26a7fd6942dce4900ce923f8eb0dccb24f1105bc0e00bf3f8cc1ca0cbdbfb34bd3c0e993d5e0b32ec37e5e219bd96ced61d9e0492efc48ad723d060a0061cba1d70daf83e1efbf94670b0d5ad41367a4f815aafb7af25e1ffd6f75843a03822c15ca94be7e6e0b48e79db9745c9cb85471134566df59067f1b0981fca6ca0ba82efd044302fcf869b1f5200fe2a66e8f6b1342e62250d516d1fd57d146a89a05f664a9019a343aec6c38016d79ae8b2be9222d343842295cf8dbc2bb14d62cca0fca0f3d3e75c5ff78bebda67d2d98cbd5820aa30c19838b12e97064ea5d2d6eca085fe1cf51280423297f407bf57f7efdca7547f743e2bd64055969833e06999eba08e143ae8475186c61f53a41975023789a3766913a468faf7ac00f5feba5fbb6080b90214f90211a077930c5270537a65dac21b9d0352f90bf0fc21a927eac5048a0bcb45b4f09029a0126e54cfa043b01cadf5e1445e107934299f493e40924e7363b4efe2920eddb6a009c821f2c45c5879b69f77d3787137b1a82be69560b8e80ec270cde95b442d8ca0badb780958dca9854b9f4d2fe1a7431d0200b0aebf1bfc4da6077d6e07e96606a0c1944010fdef1ae6634ed710a70bf69fe478bae1305c3fc360ed4eef65822d79a01bbe149f0dbc0ac567593de83a9c63671c7edac2eaf0df405ba6123c614da5dea01446c729960b918558f4771a0676d9655d7e08bfe265958e9aba5fb3ddb7fc5aa033a3cff0ecbec47e53f17a4681af55edf0a5e39c6cf095aa7e5afea2311f61e6a06a10fb5edee9f21610adf3cdc1f1ab0d3ced398552efb23163635dbe5e2df8baa0d3d902464bb1f04c41cd1f6c5aea22d16a31d602fc0d20ec09bcd2e81b7f79e7a02f013569d3338aee99a9c0a5689f3cebedf3810b2fcef81a8f1ecbfaee9a30baa022775c20675085e6bf2f247168f725e8d04492f4eedf23ff65b59ca92be35537a037b28455d6991a2f29a7cd92ebb3a9502a106dc50038d6e94786772e0805e97aa052331f8b6ab6051abfa70758eacfdd131e29a8e52b7f9bd23c4e4b16c40c635ea04bd183af5fadf489965e22e8a0267e696f4e9dee593f6956ec0c1774833ed213a030f6c95ed060ad038b6f97dd4ccbb7fa4a4caf48f9ff5703258a406a87cd287b80b901d4f901d1a0d820111cb647632d4ede6fd79b9239f0f53353ce2f1504a4aed150ca30377573a0bd280b26e347f85355dc2547de28ba3abeb85387e925208b1c5ff09b7d351cb2a03a06a471e5d086a86951651d61174709f6326edfb5c9495765b5d8b8eea3a64a80a0b25ecb74e5804a20af7596927737e3c0717c43d916345c3f06ce804428b41d34a038d393c32ce131c7db995b86a84143d5c970e24009c00484a61ccdb94b1805b8a08e1c53f25873abb10a27bf96bbeb1c27e34a17313038a0bc64abf15596bbec19a036dffabfcdf41f131c372ba9442b6e1fc88b42bd7bd71e53b57f3ae09df0fa30a0f4fe1b214f0e832f8b189c598692eec37a725912c165fc502433d5062da9d56fa00d34a28f23ab154af2824a98c75febf71e5da66cfbfd88b5153de493ddadeda7a06c4f3f8e7f01e83478b59a277d278cafcba1e2efa1a07ad9022548f208bfcf49a07b94979e7b004945dd33969da6e6a5fa0fca52bb84490a47747facb7816b70bc80a0eaf1fbd7383a6787930570ea904a49ca784c4e3774496e010f7899034333dd33a05812745a0f0a50cd63bd4e1667f246d32e35ab64b0b17a4af404f76d951a7395a01ffcd88f18df738149c57e7a8a15c3a28d060054adfb01ca78720bc84084e9ff80b873f87180808080a0071400e4b740cebbe08db57ee597c372dbca32c4d1d5fbd89a2c7a60c22aa2898080a078e69c3f43064ea564bde73737c232c46ee26127a8fbfe3222880876a928a3f2a05c0c967a055704c36d6027ac55d8d7665aea10db655d33f45e71ed5c954842a68080808080808080b872f8709d3e6b3739405336fdba54c7343ce5c67b57bf832eca8cafdfb497db78bbb850f84e81c989012ab62b734d7cc616a056e81f171bcc55a6ff8345e692c0f86e5b48e01b996cadc001622fb5e363b421a0c5d2460186f7233c927e7db2dcc703c0e500b653ca82273b7bfad8045d85a470
Then pass the proof in the verify function with other values
- evm/EVMStorageproof:
    // =================================
    // 4. Verifying Data Against the Chosen Root (Account)
    // =================================

    function verifyAccount(
        uint256 blockNumber,
        bytes memory blockHeader,
        bytes memory accountTrieProof,
        address account
    )
        public
        view
        returns (
            uint256 nonce,
            uint256 accountBalance,
            bytes32 codeHash,
            bytes32 storageRoot
        )
    {
        // Retrieve the root based on the specified type (valid)
        bytes32 stateRoot = getStateRoot(blockNumber, blockHeader);

        // Retrieve the key from the account
        bytes memory accountKey = abi.encodePacked(account);

        // Verify the account
        (bool doesAccountExist, bytes memory accountRLP) = Lib_SecureMerkleTrie
            .get(accountKey, accountTrieProof, stateRoot);

        // Decode the [`accountRLP`] into a struct
        (nonce, accountBalance, storageRoot, codeHash) = _decodeAccountFields(
            doesAccountExist,
            accountRLP
        );
    }
5. Verifying Data Against the Storage Root
In the specific case of StateRoot, the node contains StorageRoot as one of the fields. Then by using slot as the key for this storage tree, we can retrieve the corresponding storageValue in the same process as did in Step 4.
- evm/EVMStorageproof:
    // =================================
    // 5. Verifying Data Against the Chosen Root (Storage)
    // =================================
    function verifyStorage(
        bytes32 storageRoot,
        bytes32 slot,
        bytes calldata storageSlotTrieProof
    ) public view returns (bytes32 slotValue) {
        // Get valid storage root from account ( Step 4 )

        // Retrieve the key from the storage slot
        bytes memory storageKey = abi.encodePacked(slot);

        // Verify the account
        (, bytes memory slotValueRLP) = Lib_SecureMerkleTrie.get(
            storageKey,
            storageSlotTrieProof,
            storageRoot
        );

        // Decode the [`slotValueRLP`] into a value
        slotValue = slotValueRLP.toRLPItem().readBytes32();
    }
Storage Proofs workflow with Starknet
Let’s recap the workflow with Starknet. We will follow the same step which is a general rule in storage-proof technology, but depending on how states are implemented with different hash functions and MPT structure, details can be different.
1. Accessing the block hash
- starknet/StarknetStorageproof:
Starknet also supports to get block hash directly through on-chain, in this case this syscall only allows within the range of [first_v0_12_0_block, current_block - 10]. Check more detail about syscall here.
        // =================================
        // Step 1. Accessing the block hash
        // =================================

        // get origin chain's block hash on destination chain
        fn get_block_hash(self: @ContractState, block_number: u64) -> felt252 {
            let latest_block_number: u64 = get_block_info().unbox().block_number;
             // Ensure the block number is within the last 256 blocks
            assert(block_number >= latest_block_number - 256, 'Block number is too old');
            assert(block_number < latest_block_number, 'Block number is too high');

            // Syscall to get block hash
            get_block_hash_syscall(block_number).unwrap()
        }
2. Accessing the block header
- starknet/StarknetStorageproof:
In Starknet, there is no rlp encoding so passed each individual field. Also compared to Ethereum, a block hash is defined as the Pedersen hash of the header’s fields. Check more detail here.
        // =================================
        // 2. Accessing the block header
        // =================================

        // verify origin chain's block header on destination chain
        fn get_block_header(
            self: @ContractState,
            block_number: felt252,
            global_state_root: felt252,
            sequencer_address: felt252,
            block_timestamp: felt252,
            transaction_count: felt252,
            transaction_commitment: felt252,
            event_count: felt252,
            event_commitment: felt252,
            parent_block_hash: felt252
        ) -> bool {
            // Step 1. Retrieve the block hash
            let block_number_u64: u64 = block_number.try_into().unwrap();
            let retrieved_block_hash = get_block_hash_syscall(block_number_u64).unwrap();

            let hash_pedersen = PedersenImpl::new(0);
            hash_pedersen.update(block_number);
            hash_pedersen.update(global_state_root);
            hash_pedersen.update(sequencer_address);
            hash_pedersen.update(block_timestamp);
            hash_pedersen.update(transaction_count);
            hash_pedersen.update(transaction_commitment);
            hash_pedersen.update(event_count);
            hash_pedersen.update(event_commitment);
            hash_pedersen.update(0);
            hash_pedersen.update(0);
            hash_pedersen.update(parent_block_hash);
            // Step 2. Hash the provided block header and compare
            let provided_block_header_hash = hash_pedersen.finalize();

            // Step 3. Verify it
            if provided_block_header_hash == retrieved_block_hash {
                return true;
            } else {
                return false;
            }
        }
3. Determining the Desired Root
- starknet/StarknetStorageproof:
In Starknet, the global state root is not the root of MPT, it’s hashed value with the other 2 MPT’s roots. You can check out detailed information here.
       // =================================
        // 3. Determining the Desired Root (Contract tree root)
        // =================================

        // get origin chain's contract_trie_root on destination chain
        fn get_contract_trie_root(
            self: @ContractState,
            block_number: felt252,
            global_state_root: felt252,
            contract_trie_root: felt252,
            class_trie_root: felt252
        ) -> felt252 {
            // Step 1. Construct the state commitment
            let hash_poseidon = PoseidonImpl::new();
            hash_poseidon.update('STARKNET_STATE_V0');
            hash_poseidon.update(contract_trie_root);
            hash_poseidon.update(class_trie_root);
            let state_commitment = hash_poseidon.finalize();

            // Step 2. Verify the state commitment
            assert(state_commitment == global_state_root, 'state commitment does not match');

            return contract_trie_root;
        }
4. Verifying Data Against the Chosen Root
In Starknet, we verify with stateRoot to get a valid value. As we retrieved in Step 3, it can be either TransactionRoot or ReceiptsRoot. The process will be the same.
- starknet/StarknetStorageproof:
        // =================================
        // 4. Verifying Data Against the Chosen Root (Contract)
        // =================================

        fn verify_contract(
            self: @ContractState,
            block_number: felt252,
            contract_trie_root: felt252,
            contract_trie_proof: Span<felt252>,
            class_hash: felt252,
            storage_root: felt252,
            nonce: felt252,
            contract_state_hash_version: felt252,
        ) -> (felt252, felt252, felt252, felt252) {
            // Step 1. Compute the leaf of contract trie
            let hash_pedersen = PedersenImpl::new(0);
            hash_pedersen.update(class_hash);
            hash_pedersen.update(storage_root);
            hash_pedersen.update(nonce);
            hash_pedersen.update(contract_state_hash_version);
            let contract_leaf = hash_pedersen.finalize();

            // Step 2. Verify the root
            let mut merkle_tree: MerkleTree<Hasher> = MerkleTreeTrait::new();
            let computed_root = merkle_tree.compute_root(contract_leaf, contract_trie_proof);
            assert(computed_root == contract_trie_root, 'compute valid root failed');

            // Step 3. Verify the proof
            let result = merkle_tree.verify(computed_root, contract_leaf, contract_trie_proof);
            assert(result, 'verify valid proof failed');

            return (class_hash, storage_root, nonce, contract_state_hash_version);
        }
5. Verifying Data Against the Storage Root
- starknet/StarknetStorageproof:
        // =================================
        // 5. Verifying Data Against the Chosen Root (Storage)
        // =================================
        fn verify_storage(
            self: @ContractState,
            state_commitment: felt252,
            class_commitment: felt252,
            contract_address: felt252,
            storage_address: felt252,
            storage_trie_proof: Span<felt252>,
            contract_trie_proof: Span<felt252>,
            class_hash: felt252,
            storage_root: felt252,
            nonce: felt252,
            contract_state_hash_version: felt252,
        ) -> felt252 {
            // Step 1. Construct StateProof
            let storage_proof = ContractStateProof {
                class_commitment,
                contract_data: ContractData {
                    class_hash,
                    nonce,
                    contract_state_hash_version,
                    storage_proof: cast_proof_type(storage_trie_proof),
                },
                contract_proof: cast_proof_type(contract_trie_proof),
            };

             // Step 2. Verify the proof and retrieve value
            let storage_value = verify(
                state_commitment, contract_address, storage_address, storage_proof
            );
            return storage_value;
        }
    }
Summary
To summarize, storage proofs in the core are leveraging Merkle proof of state so that we can retrieve desired proven data. Starting from a valid block hash, we get a valid block header, then get valid roots from that header, and using Merkle proof we get valid node data. This all happens in various tries like state trie, transaction trie, receipt trie in Ethereum and contract trie, class trie etc in Starknet. Hope you can get a more concrete understanding of storage proofs technology. Thank you.